1 文件下载
使用 ResponseEntity 实现下载文件的功能
@RequestMapping("/testDown")
public ResponseEntity<byte[]> testResponseEntity(HttpSession session) throws IOException {
    //获取ServletContext对象
    ServletContext servletContext = session.getServletContext();
    //获取服务器中文件的真实路径
    String realPath = servletContext.getRealPath("/static/img/1.jpg");
    //创建输入流
    InputStream is = new FileInputStream(realPath);
    //创建字节数组
    byte[] bytes = new byte[is.available()];
    //将流读到字节数组中
    is.read(bytes);
    //创建HttpHeaders对象设置响应头信息
    MultiValueMap<String, String> headers = new HttpHeaders();
    //设置要下载方式以及下载文件的名字
    headers.add("Content-Disposition", "attachment;filename=1.jpg");
    //设置响应状态码
    HttpStatus statusCode = HttpStatus.OK;
    //创建ResponseEntity对象
    ResponseEntity<byte[]> responseEntity = new ResponseEntity<>(bytes, headers, statusCode);
    //关闭输入流
    is.close();
    return responseEntity;
}
2 SpringBoot 文件上传
上传文件大家首先想到的就是 Apache Commons FileUpload,这个库使用非常广泛。Spring Boot3 版本中已经不能使用了。代替他的是 Spring Boot 中自己的文件上传实现。
Spring Boot 上传文件现在变得非常简单。提供了封装好的处理上传文件的接口 MultipartResolver,用于解析上传文件的请求,他的内部实现类 StandardServletMultipartResolver。之前常用的 CommonsMultipartResolver 不可用了。CommonsMultipartResolver 是使用 Apache Commons FileUpload 库时的处理类。
StandardServletMultipartResolver 内部封装了读取 POST 其中体的请求数据,也就是文件内容。我们现在只需要在 Controller 的方法加入形参@RequestParam MultipartFile。 MultipartFile 表示上传的文件,提供了方便的方法保存文件到磁盘。
MultipartFile API
| 方法 | 作用 |
|---|---|
| getName() | 参数名称(upfile) |
| getOriginalFilename() | 上传文件原始名称 |
| isEmpty() | 上传文件是否为空 |
| getSize() | 上传的文件字节大小 |
| getInputStream() | 文件的 InputStream,可用于读取部件的内容 |
| transferTo(File dest) | 保存上传文件到目标 dest |
2.1 5.7.1 MultipartResolver
step1:服务器创建目录存放上传后的文件
例如在 E:/upload
step2: 创建 index.html 作为上传后的显示页面
resources/static/index.html
<html lang="en">
  <body>
    <h3>项目首页,上传文件成功</h3>
  </body>
</html>
step3:创建上传文件页面
<!DOCTYPE html>
<html lang="en">
<head>
  <meta charset="UTF-8">
  <title>Title</title>
</head>
<body>
  <h3>上传文件</h3>
  <form action="files" enctype="multipart/form-data" method="post">
    选择文件:<input type="file" name="upfile" > <br/>
    <input type="submit" value="上传文件">
  </form>
</body>
</html>
要求:
- enctype=“multipart/form-data”
- method=“post”
<input type="file" name="upfile" >表示一个上传文件,upfile 自定义上传文件参数名称
step4:创建 Controller
@Controller
public class UploadFileController {

  @PostMapping("/upload")
  public String upload(@RequestParam("upfile") MultipartFile multipartFile){

    Map<String,Object> info = new HashMap<>();

    try {
      if( !multipartFile.isEmpty()){
        info.put("上传文件参数名",multipartFile.getName());
        info.put("内容类型",multipartFile.getContentType());

        var ext = "unknown";
        var  filename = multipartFile.getOriginalFilename();
        if(filename.indexOf(".") > 0){
           ext = filename.substring(filename.indexOf(".") + 1);
        }

        var newFileName = UUID.randomUUID().toString() + ext;
        var path = "E:/upload/" + newFileName;
        info.put("上传后文件名称", newFileName );

        multipartFile.transferTo(new File(path));
      }
    } catch (IOException e) {
      throw new RuntimeException(e);
    }
    //防止 刷新,重复上传
    return "redirect:/index.html";
  }
}
step5:测试
浏览器访问 http://localhost:8080/upload.html
文件上传,查看 E:/upload 目录上传的文件
Spring Boot 默认单个文件最大支持 1M,一次请求最大 10M。改变默认值,需要 application 修改配置项
spring.servlet.multipart.max-file-size=800B
spring.servlet.multipart.max-request-size=5MB
spring.servlet.multipart.file-size-threshold=0KB
file-size-threshold 超过指定大小,直接写文件到磁盘,不在内存处理。
配置错误页面
resources/static/error/5xx.html
<!DOCTYPE html>
<html lang="en">
  <head>
    <meta charset="UTF-8" />
    <title>Title</title>
  </head>
  <body>
    <h3>上传文件错误</h3>
  </body>
</html>
2.2 Servlet 规范
Servlet3.0 规范中,定义了 jakarta.servlet.http.Part 接口处理 multipart/form-data POST 请求中接收到表单数据。有了 Part 对象,其 write()方法将上传文件保存到服务器本地磁盘目录。
在 HttpServletRequest 接口中引入的新方法:
- getParts():返回 Part 对象的集合
- getPart(字符串名称):检索具有给定名称的单个 Part 对象。
Spring Boot 3 使用的 Servlet 规范是基于 5 的,所以上传文件使用的就是 Part 接口。
StandardServletMultipartResolver 对 Part 接口进行的封装,实现基于 Servlet 规范的文件上传。
原生的 Serlvet 规范的文件上传
@Controller
public class UploadAction {

  @PostMapping("/files")
  public String upload(HttpServletRequest request){
    try {
      for (Part part : request.getParts()) {
        String fileName = extractFileName(part);
        part.write(fileName);
      }
    } catch (IOException e) {
      throw new RuntimeException(e);
    } catch (ServletException e) {
      throw new RuntimeException(e);
    }
    return "redirect:/index.html";
  }

  private String extractFileName(Part part) {
    String contentDisp = part.getHeader("content-disposition");
    String[] items = contentDisp.split(";");
    for (String s : items) {
      if (s.trim().startsWith("filename")) {
        return s.substring(s.indexOf("=") + 2, s.length()-1);
      }
    }
    return "";
  }
}
上传文件包含 header 头 content-disposition,类似下面的内容, 可获取文件原始名称。
form-data; name=“dataFile”; filename=“header.png”
application 文件,可配置服务器存储文件位置,例如:
spring.servlet.multipart.location=E://files/
2.3 多文件上传
多文件上传,在接收文件参数部分有所改变 MultiPartFile [] files 。循环遍历数组解析每个上传的文件。
前端请求页面:
<html>
  <body>
    <h3>上传文件</h3>
    <form action="files" enctype="multipart/form-data" method="post">
      选择文件1:<input type="file" name="upfile" /> <br />
      选择文件2:<input type="file" name="upfile" /> <br />
      <input type="submit" value="上传文件" />
    </form>
  </body>
</html>
3 文件上传
配合着后面部分一起看。
文件上传要求 form 表单的请求方式必须为 post,并且添加属性 enctype=“multipart/form-data”
SpringMVC 中将上传的文件封装到 MultipartFile 对象中,通过此对象可以获取文件相关信息
上传步骤:
a>添加依赖:
<!-- https://mvnrepository.com/artifact/commons-fileupload/commons-fileupload -->
<dependency>
    <groupId>commons-fileupload</groupId>
    <artifactId>commons-fileupload</artifactId>
    <version>1.3.1</version>
</dependency>
b>在 SpringMVC 的配置文件中添加配置:
<!--必须通过文件解析器的解析才能将文件转换为MultipartFile对象-->
<!-- 通过 ID 获取 bean 对象,因此 ID 要配置好这个 -->
<bean id="multipartResolver" class="org.springframework.web.multipart.commons.CommonsMultipartResolver"></bean>
c>控制器方法:
@RequestMapping("/testUp")
public String testUp(MultipartFile photo, HttpSession session) throws IOException {
    //获取上传的文件的文件名
    String fileName = photo.getOriginalFilename();
    //处理文件重名问题
    String hzName = fileName.substring(fileName.lastIndexOf("."));
    fileName = UUID.randomUUID().toString() + hzName;
    //获取服务器中photo目录的路径
    ServletContext servletContext = session.getServletContext();
    String photoPath = servletContext.getRealPath("photo");
    File file = new File(photoPath);
    if(!file.exists()){
        file.mkdir();
    }
    String finalPath = photoPath + File.separator + fileName;
    //实现上传功能
    photo.transferTo(new File(finalPath));
    return "success";
}
d>视图内容:
<form th:action="@{/testUp}" method="post" enctype="multipart/form-data">
头像:<input type="file" name="photo" /><br />
<input type="submit" value="上传" />
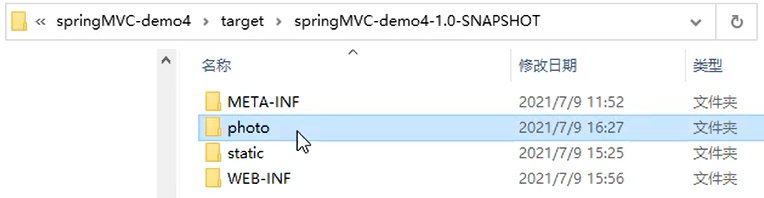
</form>上传到的位置:
4 单个文件上传
SpringMVC 对文件的上传做了很好的封装,所以使用 SpringMVC 可以非常方便的实现文件上传。从 Spring3.1 开始,对于文件上传,提供了两个处理器:
CommonsMultipartResolver:兼容性较好,可以兼容 Servlet3.0 之前的版本,但是它依赖了commons-fileupload这个第三方工具,所以如果使用这个,一定要添加commons-fileupload依赖。StandardServletMultipartResolver:兼容性较差,它适用于 Servlet3.0 之后的版本,它不依赖第三方工具,使用它,可以直接做文件上传。
本文使用 CommonsMultipartResolver 解析器来举例,并且以图片的上传的案例来介绍,下面是相关的具体操作:
[1] 导入文件上传相关的依赖包。
<!-- https://mvnrepository.com/artifact/commons-fileupload/commons-fileupload -->
<dependency>
    <groupId>commons-fileupload</groupId>
    <artifactId>commons-fileupload</artifactId>
    <version>1.4</version>
</dependency>
<!-- https://mvnrepository.com/artifact/commons-io/commons-io -->
<dependency>
    <groupId>commons-io</groupId>
    <artifactId>commons-io</artifactId>
    <version>2.4</version>
</dependency>
[2] 在 SpringMVC 的配置文件中配置 CommonsMultipartResolver 解析器:
注意:CommonsMultipartResolver 这个 Bean 一定要有 id,并且 id 必须是 multipartResolver
<?xml version="1.0" encoding="UTF-8"?>
<beans xmlns=" http://www.springframework.org/schema/beans"
       xmlns:xsi=" http://www.w3.org/2001/XMLSchema-instance"
       xmlns:context=" http://www.springframework.org/schema/context"
       xmlns:mvc=" http://www.springframework.org/schema/mvc"
       xsi:schemaLocation=" http://www.springframework.org/schema/beans
       http://www.springframework.org/schema/beans/spring-beans.xsd
       http://www.springframework.org/schema/context
       http://www.springframework.org/schema/context/spring-context.xsd
       http://www.springframework.org/schema/mvc
       https://www.springframework.org/schema/mvc/spring-mvc.xsd">

    <!-- 开启包扫描 -->
    <context:component-scan base-package="com.thr"/>
    <!-- 配置访问静态资源 -->
    <mvc:resources mapping="/**" location="/"/>
    <!-- 配置MVC注解驱动 -->
    <mvc:annotation-driven/>
    <!-- 注册视图解析器 -->
    <bean id="viewResolver" class="org.springframework.web.servlet.view.InternalResourceViewResolver">
        <!-- 配置前缀 -->
        <property name="prefix" value="/WEB-INF/pages/"/>
        <!-- 配置后缀 -->
        <property name="suffix" value=".jsp"/>
    </bean>
    <!-- 配置文件上传数据专用的解析器 -->
    <!-- 这个bean的id必须是multipartResolver -->
    <bean id="multipartResolver" class="org.springframework.web.multipart.commons.CommonsMultipartResolver">
        <!-- 设置文件编码格式 -->
        <property name="defaultEncoding" value="utf-8"/>
        <!-- 设置最大上传大小 -->
        <property name="maxUploadSize" value="#{1024*1024}"/>
    </bean>
</beans>
[3] 编写文件上传的页面
注意:上传文件的表单中有三点需要注意:
- 要点 1:请求方式必须是
POST - 要点 2:
enctype属性必须是multipart/form-data, 以二进制的方式传输数据 - 要点 3:文件上传框使用
input标签,type属性设置为file
<%@ page contentType="text/html;charset=UTF-8" language="java" %>
<html>
  <head>
    <title>文件上传</title>
  </head>
  <body>
    <h1>单文件上传演示案例</h1>
    <form
      action="${pageContext.request.contextPath}/upload"
      method="post"
      enctype="multipart/form-data"
    >
      请选择上传的图片:<input type="file" name="file" /><br />
      <input type="submit" value="上传单个文件" />
    </form>
  </body>
</html>
**[4] 编写文件上传的 Controller。**此时会用到 MultipartFile 这个接口,MultipartFile 封装了请求数据中的文件,此时这个文件存储在内存中或临时的磁盘文件中,需要将其转存到一个合适的位置,因为请求结束后临时存储将被清空。在 MultipartFile 接口中有如下方法:
| 方法名 | 返回值 | 描述 |
|---|---|---|
| getContentType() | String | 获取文件内容的类型 |
| getOriginalFilename() | String | 获取文件的原名称 |
| getName() | String | 获取 form 表单中文件组件的名字 |
| getInputStream() | InputStream | 将文件内容以输入流的形式返回 |
| getSize() | long | 获取文件的大小,单位为 byte |
| isEmpty() | boolean | 文件是否为空 |
| transferTo(File dest) | void | 将数据保存到一个目标文件中 |
具体的 Controller 代码如下所示:
@Controller
public class UploadController {

    @Autowired
    private ServletContext servletContext;

    @RequestMapping(value = "/upload", method = RequestMethod.POST)
    public String uploadFile(MultipartFile file, Model model, HttpServletRequest request) throws IOException {

        // 获取图片文件名
        String originalFilename = file.getOriginalFilename();
        // 使用 UUID 给图片重命名,并且去掉 UUID 的四个"-"
        String fileName = UUID.randomUUID().toString().replaceAll("-", "");
        //获取图片的后缀
        String extName = originalFilename.substring(originalFilename.lastIndexOf("."));
        // 拼接新的图片名称
        String newFileName = fileName + extName;

        // 声明转存文件时,目标目录的虚拟路径(也就是浏览器访问服务器时,能够访问到这个目录的路径)
        String virtualPath = "/images";

        // 准备转存文件时,目标目录的路径。File 对象要求这个路径是一个完整的物理路径。
        // 而这个物理路径又会因为在服务器上部署运行时所在的系统环境不同而不同,所以不能写死。
        // 需要调用 servletContext 对象的 getRealPath()方法,将目录的虚拟路径转换为实际的物理路径
        String targetDirPath = servletContext.getRealPath(virtualPath);
        System.out.println("targetDirPath = " + targetDirPath);

        // 创建 File 类型的对象用于文件转存
        File filePath = new File(targetDirPath, newFileName);

        if (!filePath.getParentFile().exists()) {
            //如果文件夹不存在就新建一个
            filePath.getParentFile().mkdirs();
        }

        // 调用 transferTo()方法实现文件转存
        file.transferTo(filePath);

        // 为了让下一个页面能够将图片展示出来,将图片访问路径存入模型,把访问图片的路径准备好
        String picPath = servletContext.getContextPath() + "/images/" + newFileName;
        System.out.println("picPath = " + picPath);

        model.addAttribute("picPath", picPath);

        return "target";
    }
}
[5] 编写上传成功的目标页面,用于显示图片。
<%@ page contentType="text/html;charset=UTF-8" language="java" %>
<html>
  <head>
    <title>目标页面</title>
  </head>
  <body>
    <h1>上传成功</h1>
    <img src="${requestScope.picPath}" />
  </body>
</html>
[6] 运行结果如下图所示:

5 多个文件上传
多个文件的上传就是在单个上传文件的基础上增加了一个循环的步骤,比较的简单,具体操作如下所示。
[1] 编写多个文件上传的页面
<%@ page contentType="text/html;charset=UTF-8" language="java" %>
<html>
  <head>
    <title>文件上传</title>
  </head>
  <body>
    <h1>多文件上传演示案例</h1>
    <form
      action="${pageContext.request.contextPath}/uploadMore"
      method="post"
      enctype="multipart/form-data"
    >
      请选择上传的图片:<input type="file" name="files" /><br />
      请选择上传的图片:<input type="file" name="files" /><br />
      请选择上传的图片:<input type="file" name="files" /><br />
      <input type="submit" value="上传单个文件" />
    </form>
  </body>
</html>
[2] 编写多个文件上传的 Controller
/**
 * 多个文件的上传
 */
@Controller
public class UploadController {

    @Autowired
    private ServletContext servletContext;

    @RequestMapping(value = "/uploadMore", method = RequestMethod.POST)
    public String uploadFileMore(@RequestParam("files") List<MultipartFile> fileList, Model model, HttpServletRequest request) throws IOException {
        //用于存储发送至前台页面展示的路径
        List<String> filePathNames = new ArrayList<>();

        // 定义存储目标文件的目录
        String targetDirPath = servletContext.getRealPath("/images");
        System.out.println("targetDirPath = " + targetDirPath);

        //循环遍历请求中的文件
        for (MultipartFile file : fileList) {
            // 获取图片文件名
            String originalFilename = file.getOriginalFilename();
            // 使用 UUID 给图片重命名,并且去掉 UUID 的四个"-"
            String fileName = UUID.randomUUID().toString().replaceAll("-", "");
            //获取图片的后缀
            String extName = originalFilename.substring(originalFilename.lastIndexOf("."));
            // 拼接新的图片名称
            String newFileName = fileName + extName;

            // 创建 File 类型的对象用于文件转存
            File filePath = new File(targetDirPath, newFileName);
            if (!filePath.getParentFile().exists()) {
                //如果文件夹不存在就新建一个
                filePath.getParentFile().mkdirs();
            }

            // 调用 transferTo()方法实现文件转存
            file.transferTo(filePath);

            // 为了让下一个页面能够将图片展示出来,将图片访问路径存入模型,把访问图片的路径准备好
            String picPath = servletContext.getContextPath() + "/images/" + newFileName;
            System.out.println("picPath = " + picPath);

            filePathNames.add(picPath);
        }
        if (filePathNames.size() > 0) {
            model.addAttribute("filePathNames", filePathNames);
        }
        return "targetmore";
    }
}
[3] 上传成功后展示图片的页面
<%@ taglib prefix="c" uri="http://java.sun.com/jsp/jstl/core" %> <%@ page
contentType="text/html;charset=UTF-8" language="java" %>
<html>
  <head>
    <title>目标页面</title>
  </head>
  <body>
    <h1>上传成功</h1>
    <c:forEach items="${filePathNames}" var="fileName">
      <img src="${fileName}" />
    </c:forEach>
  </body>
</html>
[4]、运行结果如下图所示:

6 关于已上传文件的保存问题
[1] 保存到 Tomcat 服务器上的缺陷
- 当用户上传文件非常多的时候,拖慢 Tomcat 运行的速度
- 当 Web 应用重新部署时,会导致用户以前上传的文件丢失
- 当 Tomcat 服务器以集群的形式运行时,文件不会自动同步
[2] 建议的解决方案
- 自己搭建文件服务器,例如:FastDFS 等
- 第三方文件服务
- 阿里云提供的 OSS 对象存储服务
- 七牛云
- ……